Getting Started with Azure: What are Azure Virtual Machines and how to create it using Terraform
Azure VMs are like your own computer on the cloud. You can choose between different Operational Systems, such as Linux and Windows, and they can be used for different goals, like hosting a website for example.
Virtual Machines are part of a category called Infrastructure as Code, and they are still relevant in many scenarios, even with the advent of Platform as Code, where you are in control of many aspects, such as security, identity and access, high availability, and others.
What do I need to create a Virtual Machine on Azure?
To create the VM there are a few Azure resources that are necessary to be created before, as we can see in the image below:
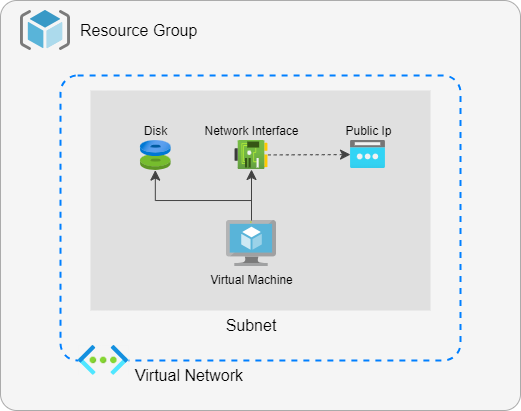
Resources that are Pre-requisites
There are some resources that are not necessarily part of the same life cycle of your VM, and you might have already created them on your Azure environment. On the script that I am providing below, they are being created, but you might decide to use a resource that already exists.
**Resource Group: **A resource group works similarly to a folder, where you can group the resources that have something in common. It can be resources of the same type, such as VMs, or the most recommended, resources that share the same life cycle.
**Virtual Network: **In an Azure VNet, you are able to create a private space, where your resources can communicate securely. It works similarly to the network that you are connected to right now to read this post, but it sits on Azure.
Subnet: They are subdivisions of a Virtual Network, helping to keep organized and segmented by different types of resources, like Databases, Front and Backend applications.
Resources that are part of the Virtual Machine life cycle
**Disks: **Disks are used to store operating systems, applications, or data. Each VM created on Azure has at least one OS Disk, but it can have multiple.
Network Interface Card: Also known as NIC, a Network Interface Card is responsible for connecting the VM with the network that we saw earlier. Similar to disks, each VM must have at least one, but also multiple NICs are supported.
Public IP: A Public IP is the communication between the VM and the world. This resource is not mandatory, and in most cases inside a business context, it should be created very cautiously, to avoid any security risk. However, as it is a simple test and I don’t want to complicate it, we need the Public IP to be able to connect to our VM. It is connected to the Network Interface.
Terraform Script
Pre-requisites
Below is the section of Terraform that creates the pre-requisites. As I mentioned before, it is possible to use existing resources, however, you need to adapt the script to use them.
In this script, we are creating the resource group, virtual network, and subnet.
Virtual Machine
Finally, this is the script to create the VM resources. Here we create first a Public IP, the Network Interface Card, and associate the PIP on it, and a VM. Note that the Terraform VM resource already abstracts the disk internally. It’s also interesting to highlight that the VM associates the NIC created before, creating a dependency, which Terraform will identify and create in the correct order.
Complete Script
Below is the complete script, including provider, variables, and outputs:
Conclusion
Below it is the link to my GitHub repository where I am creating a library to have all references related to Terraform. I hope that this post despite being simple might be helpful! wesleycamargo/terraform (github.com)
